
Wondering how to connect a trolling motor to your boat’s battery? It’s a straightforward process once you have the right tools and know the steps.
By the end, you’ll be able to safely wire your motor, check your connections, and ensure everything is set for smooth sailing.
Keep reading to find out exactly how to do it the right way.
Gather the Tools and Materials You’ll Need for Trolling Motor Wiring
To wire your trolling motor safely and effectively, you’ll need a set of essential tools and materials. Start with a deep-cycle marine battery, which provides reliable power and withstands the vibrations and moisture common in boat environments. Use marine-grade tinned copper wire for core wiring; it resists corrosion and ensures durable connections. Make sure to have the appropriate battery cables that match your motor’s current demands.
Equip yourself with a wire stripper for clean metal exposure and a ratcheting crimper to attach terminal connections securely. A multimeter is crucial for testing voltage and verifying proper wiring. To protect connections from moisture and corrosion, apply adhesive-lined heat shrink tubing and use a heat gun for sealing. Additionally, gather ring terminals for secure terminations, a battery switch for easy power disconnects, cable ties to keep wiring neat and organized, and wrenches to tighten terminal hardware properly. Marine-grade components are a must, as they resist corrosion and vibrations far better than automotive parts, ensuring that your setup remains reliable over time. For recharging your battery while away from shore, consider a portable solar panel with a plug socket as a convenient power source. If you prefer a simple setup without a battery, a solar charger without battery can directly power small electronics on the boat. On the battery itself, using top post battery terminals ensures a high-quality, secure connection that minimizes resistance and maximizes performance. With all these tools and materials assembled, you are ready to build a professional-grade trolling motor wiring system.

High Quality:Our marine wire is made of real copper strands and tinned to make sure conduct well,resist corrosion, high durability,flexibility,stability for a long-lasting performance

High Quality:Our marine wire is made of tinned copper to make sure good conductivity,Anti-corrosion, high durability,flexibility,stability for a long-lasting performance

Heavy Duty 16 Gauge Marine Wire:Our 16 AWG marine wire is made of tinned copper to make sure good conductivity,corrosion resistance, high durability,flexibility,stability for a long-lasting performance
Choose the Right Wire Gauge, Fuse, and Breaker Size
For breaker sizing, always match it to the motor current rather than just the wire capacity. For example, a 50-amp breaker is suitable for motors drawing between 30 and 42 amps, while a 60-amp breaker pairs with systems that draw 50 to 56 amps. Using the correct breaker size ensures proper protection and prevents nuisance trips. It’s essential to select a marine-grade stranded wire for durability in harsh environments and to use a resettable breaker so you can easily restore power without replacing components. For systems with high current draw, choosing a master switch for battery that matches the breaker rating is also critical for safe operation. Always consult manufacturer charts or specifications to determine the appropriate breaker size based on motor amperage for safety and optimal performance. Corroded connections at the shore power inlet are a common source of sparking issues that can also affect breaker reliability. To spot trouble early, watch for warning signs of a bad marine battery such as slower cranking or swollen casing, which indicate the need for replacement.

Protect your system: using as circuit breaker and battery Disconnect, allows to charge or maintain the battery without having to disconnect all the wires; Protect excessive current between battery or electrical from damage

Amperage: 30a DC, max voltage: 28V DC, interrupt capacity: 2500a at 28V DC

Protect your system: 100A circuit breaker allows to charge or maintain the battery without having to disconnect all the wires! protect excessive current between battery or electrical from damage.
Wire a 12V Trolling Motor System
To wire a 12V trolling motor system, start with a single deep-cycle marine battery mounted securely in a box close to the motor. Run a red positive cable from the battery’s positive terminal to the motor’s positive lead or plug, using marine-grade connectors like ring terminals or butt splices. Crimp these connections firmly to prevent looseness. Connect a black negative cable from the battery’s negative terminal to the motor’s negative lead, matching black-to-black on plug systems for polarity consistency. Ensure all connections are tight, clean, and insulated to prevent shorts. Install a quick-connect plug or receptacle system for easy disconnection when needed. Double-check the wiring to confirm correct polarity, as reversing red and black wires can cause damage to your motor. Regularly maintain the system by cleaning battery terminals and checking electrolyte levels to extend its lifespan. Keep cable lengths equal to maintain balanced resistance, ensuring smooth operation. After making all connections, use a high-performance heat gun to apply heat shrink tubing over each crimped connector for durable insulation and corrosion resistance. For safety, use a lanyard kill switch designed to shut off power in an emergency. When routing cables through the battery box, always pass them through a sealed grommet in the lid to prevent chafing and moisture intrusion. Once completed, your 12V trolling motor system is ready for use.

[SAFE AND RELIABLE] Trolling motor plug 12v-24-48v and socket housings are made of corrosion resistant and flame retardant materials with a sealed waterproof cover for waterproofing, Helps you cope with challenging marine weather conditions with ease. More than 10,000 trolling boats have already chosen ATQYZLM brand trolling motor connectors, welcome to join us.
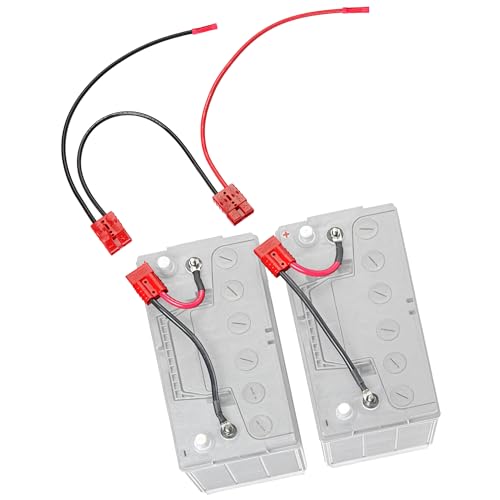
THE STRAIGHT 24V TROLLING MOTOR WIRING KIT: Two 12V batteries, one pre-built series bridge, one plug to the motor. No onboard charging leads. Built for anglers who charge off the boat or with a portable charger.
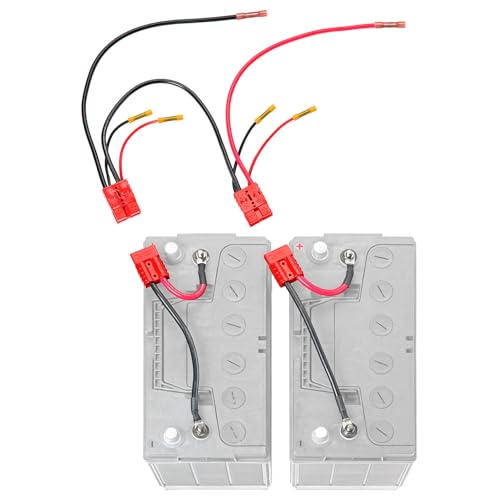
WIRES TWO 12V BATTERIES INTO 24V: The bridge connector is pre-built for a series connection, so the batteries land at 24 volts. No tracing a diagram in a dark battery compartment, and no wrong post to land the jumper on. Snap it together and your 24V trolling motor is wired.
Wire a 24V or 36V System by Connecting Batteries in Series
To wire a 24V or 36V trolling motor system, you need to connect your 12V batteries in series. For a 24V setup, use two batteries. Connect a jumper wire from the positive terminal of battery 1 to the negative terminal of battery 2. The motor’s positive lead then connects to the positive terminal of battery 2, and the negative lead connects to the negative terminal of battery 1. For a 36V setup, add a third battery. Connect battery 2’s positive terminal to battery 3’s negative terminal with a jumper wire. The motor connects to the negative terminal of battery 1 and the positive terminal of battery 3. Keep cables organized by arranging batteries so that jumpers reach adjacent terminals smoothly, which reduces clutter and simplifies maintenance. Always turn off the motor during wiring and ensure all connections are tight and secure. It’s also important to include a fuse on the power lead for safety. Remember, all batteries in the bank should be identical 12V models to prevent damage to your system. To prevent imbalance and potential damage, always use identical batteries when building any battery bank. Use a multimeter set to DC to verify voltage at the terminals before powering the motor. After wiring, the charging time will depend on the battery’s state of discharge and your charger’s output, so plan for several hours before your next outing. Experienced boaters recommend using a smart charger with automatic shutoff to prevent overcharging and extend battery life.

FITS GROUP 24 BATTERIES: Securely holds standard marine and RV batteries up to 10.125 inches tall; interior measures 10.6 x 7 x 10.125 inches for a stable and precise fit


FITS GROUP 27 BATTERIES: Securely holds larger marine and RV batteries up to 10.5 inches high; interior measures 13.06 x 6.9 x 10.5 inches for a precise, reliable fit
Test Voltage and Check Polarity Before Powering On
Start by testing the voltage before powering up. Set your multimeter to DC volts and select a range above your battery’s nominal voltage—for example, 20V for a 12V battery. Touch the red probe to the positive terminal and the black probe to the negative terminal. A healthy 12V battery should read between 12.6 and 12.8 volts at rest. Confirm that this matches your motor’s system requirements, and repeat the measurement at the plug or motor end to ensure consistency. To ensure safety when working near the energized motor circuit, always select voltage mode rather than continuity mode. To further verify battery health, you can use a battery load tester to measure the cranking amps under simulated starting conditions. For boats that require both starting and trolling power, a dual purpose battery can provide a suitable compromise between cranking and deep cycling performance. Charging such a battery typically requires a specific amp rating based on its capacity and type.
Always check the polarity before powering on. With the probes still in place, a positive reading indicates correct wiring. A negative reading signals reversed wiring or terminal connections. Double-check battery labels and verify that the same polarity carries through to the motor connection. If you notice a significant voltage drop between the battery and the plug, inspect your wiring for faults or loose connections. Never assume wiring is correct—measure first. If the polarity is reversed, pause and correct the wiring before applying power.
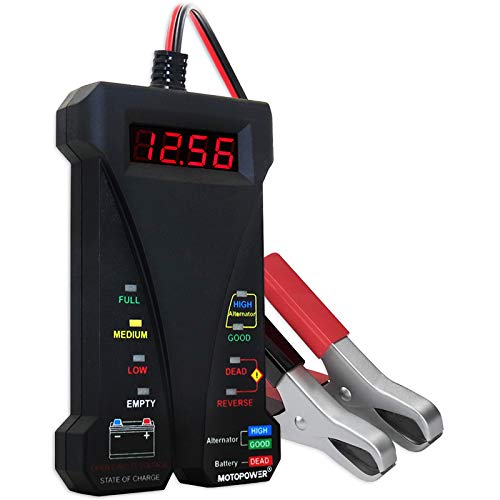
Effortless Operation - Boasting a “plug-and-test” design, there's no need for complex set-up procedures. Just connect it to the battery following simple steps. Without starting the vehicle, you can read the battery status, and after starting, quickly obtain the alternator status. Whether you're a professional mechanic or an ordinary car owner, you can easily use it to quickly determine if the battery needs jump - starting, replacement, or if the alternator output is normal.

[Car Battery Tester] You can easily test and inspect your 12V lead-acid battery with this TOPDON car battery tester. The SOH (State of Health), SOC (State of Charge), Voltage, Current, Rating, and numerous other understandable analytical data are provided by this battery tester. It is compatible with 100-2000CCA regular flooded, AGM flat plate/spiral, EFB, and GEL for their optimum performance.

【Reliable Car Battery Tester】: The alternator tester can accurately determine whether the car battery needs to be replaced or if there is a power outage, and at the same time evaluate the output status of the alternator, clearly presents real-time voltage data, battery health and charging status. It can effectively prevent the battery from being damaged due to overcharging or undercharging, and extend the battery's service life.