
Looking to keep your kayak electronics safe and dry on your adventures? Building a waterproof battery box is a straightforward project that can keep your power source secure and protected from water.
By choosing the right enclosure and wiring carefully, you’ll ensure your gear stays charged no matter the conditions.
Below, you’ll find step-by-step guidance to help you craft your own reliable kayak battery box.
Choose Your Kayak Dry Box and Battery Type
Start by selecting a waterproof enclosure that fits your battery’s dimensions, with extra space for fuse holders and cable bends. Look for an enclosure rated IP67 or higher, or specifically marine-grade, to ensure it blocks spray and rain effectively. This protective casing prevents corrosion and keeps your gear dry even in rough water conditions. Applying anti-corrosion grease to the battery terminals further reduces oxidation and improves electrical conductivity. A kill switch with lanyard provides an immediate emergency shutoff that is easily accessible while paddling. To maintain charge while on the water, consider using a portable solar panel as a convenient top-up option.
Next, choose a LiFePO4 battery because it’s lighter than lead-acid and has a longer cycle life. For shorter kayak trips, a 30Ah battery should be enough to power your fish finder and small electronics. If you plan longer outings or need to run multiple devices, a 50Ah pack will support heavier loads and extended use.
Always verify your battery’s voltage matches your electronics’ requirements. Prioritize secure mounting and proper cabling to avoid pinched leads when closing the enclosure lid. Implement safety measures such as fuse holders to protect against electrical faults. Properly selecting and fitting your dry box and battery setup ensures durability, safety, and reliable performance on the water.

FITS GROUP 27 BATTERIES: Securely holds larger marine and RV batteries up to 10.5 inches high; interior measures 13.06 x 6.9 x 10.5 inches for a precise, reliable fit
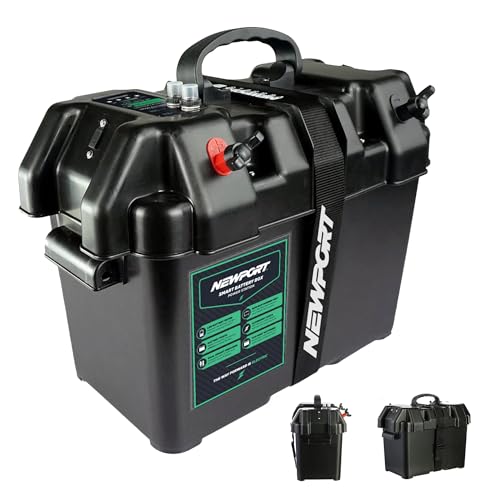
🔋 SIMPLE, CLEAN POWER SETUP FOR ANY BOAT: Take the guesswork out of wiring with a 12V trolling motor battery box power center designed to make setup fast and straightforward. No exposed terminals or messy connections—just a clean, organized marine battery solution for kayaks, jon boats, and small watercraft.

Acid resistant polyethylene battery box provides a sound solution to storing a single group 24 battery
Gather Tools: Drill, Crimpers, Sealant, and Heat-Shrink
Gathering the right tools is essential before assembling your kayak battery box. You need a cordless drill, ratcheting crimpers, marine sealant, and a heat gun with adhesive-lined heat-shrink tubing. Your drill will handle mounting and cable pass-throughs, so keep its chuck clean to ensure safety and precision. Use ratcheting crimpers to create consistent, watertight connections; always test each crimp with a pull to verify strength. Match the crimper jaws to your terminal size to ensure reliable joints. For those choosing specific components, consulting reviews of top post battery terminals ensures you select components that deliver both quality and performance. For stainless steel ties, cable tie guns provide uniform tension and a flush cut for a secure, corrosion-resistant finish. When selecting a charging method, consider using a solar charger without battery for direct, efficient power delivery to your setup.
Apply marine sealant around all penetrations to prevent water ingress and spray. Be careful to avoid covering moving parts or areas where it could cause problems later. When sealing connections with heat-shrink tubing, use a heat gun to evenly heat the tubing from the far end toward the opening. This expels trapped air and creates a secure, waterproof seal. A heat gun offers better control than open flames, reducing the risk of damage and ensuring long-term safety. Use 8-gauge wires with ring terminals for connections to handle the high current demand from your dual 20Ah battery setup.
Finally, maintain your tools after each use: clean the drill and crimpers promptly to prevent corrosion. Proper maintenance prolongs their lifespan and keeps your rigging secure on the water.

3:1 SHRINK RATIO & FAST CONTRACTON SPEED: Shrinks to 1/3 of its original diameter and seals extremely tightly, solving the problem of many 2:1 shrink tubes that don't shrink enough and therefore don't seal tightly enough, Shrink temperature: 80 to 125°C, Provides a professional connection within seconds.

50MM EXTRA LONG – 2" length ensures full terminal coverage and strain relief, 5mm longer than standard kits

Controlled Shrink Fit: The 3:1 tubing reduces to one-third of its supplied diameter when heated; select a size that fits over the connection before applying heat.
Drill Holes for Cables and Fittings
Choose a drill hole size that is only slightly larger than the connector or cable end. For example, a 1-inch hole is suitable for a through-hull plug, while a 1.5-inch opening fits larger grommets. For spade connectors, an 8 to 10 mm hole generally works well. Smaller openings make sealing easier and more effective. When selecting a master switch for your battery system, ensure it is rated for the amperage to handle high current loads safely.
Use a step drill bit for controlled enlargement, which helps maintain accuracy and minimizes damage. After drilling, smooth the edges with sandpaper to prevent cable abrasion and improve sealing contact. Dry-fit the connector or cable to verify that the opening is not too tight. Removing burrs ensures a cleaner sealant application and a better overall seal.
Never proceed to sealing until you are confident that the fit is perfect. A precise hole size reduces the risk of leaks and makes future adjustments simpler. For optimal protection, consider the type of battery box used in ice fishing setups to ensure durability in extreme cold. Following the principle of “measure twice, drill once” ensures precise hole placement and prevents errors during installation. For monitoring battery state accurately, integrating a Renogy battery monitor with a shunt provides precise readings of charge and discharge.
Install a Waterproof Cable Pass-Through
Installing an IP68-rated cable gland is essential for your kayak battery box because it guarantees reliable water ingress protection during continuous immersion. The gland must match your wire diameter precisely; a loose fit allows water entry, while too tight can damage the seal. Choose a straight-through gland if you have a single cable, or opt for a multi-cable version if you need to pass multiple leads through one sealed point. For applications where the gland will be mounted to a panel, screw-hole mounting provides a more rigid and tamper-resistant fix than a simple snap-in design. Understanding why your shore power cord sparks can help you avoid similar connection issues that compromise electrical integrity.
Low-profile deck glands are ideal for tight spaces and help prevent snagging. UV-stable bodies withstand prolonged sun exposure, making them suitable for open-kayak environments. Always deburr your drilled hole beforehand to avoid damaging the sealing washer. Pass the cable through, seat the gland body securely, and tighten the compression nut firmly—being careful not to crush it, as deforming the seal compromises waterproofing.
Marine-grade materials like brass or chrome plating ensure durability against saltwater corrosion. Also, remember to seal any unused openings with appropriate plugs or caps to maintain the box’s watertight integrity. For added safety, proper routing and connections as described in a shore power inlet guide can help prevent strain on the cable gland and maintain a reliable seal.

【Complete Cable Gland Kit – 25 Pieces】Includes 25 pieces in 5 popular sizes: PG7 (×7), PG9 (×5), PG11 (×5), PG13.5 (×4), PG16 (×4). Covers cable diameters from 3mm to 14mm – ideal for most electrical wiring projects.

Materials:UL approved Nylon PA66(Flammability UL 94V-2) for A.C.F parts EPDM rubber for B.D parts

Various Size: There are 50 pieces of cable gland waterproof Adjustable 3-16mm to meet your needs.And 6 waterproof cable gland models with gaskets in a PP box.(Package includes: PG7x20 pcs, PG9x10 pcs, PG11x6 pcs, PG13.5x5 pcs, PG16x4 pcs, PG19x5 pcs)
Wire the Positive and Negative Leads Inside the Box
Inside the box, wire the positive (red) and negative (black) leads as a matched pair, keeping them tidy and preventing snagging. Trim them to the shortest practical length, leaving enough slack for future service or adjustments. Color coding is essential: red indicates positive, black indicates negative. Always double-check the polarity at each connection point before tightening the terminals to avoid reverse wiring that could cause damage or safety hazards. Use a soldering iron to securely connect these wires, as heat shrink tubing over soldered joints provides insulation and waterproofing. A thermal circuit breaker can be used instead of a fuse for automatic reset protection against overloads. For a permanent dual-battery setup, an ACR can manage charging between batteries more efficiently than a simple isolator. For a 24V system, two 12V batteries wired in series provide the required voltage.
Connect the negative lead first, then the positive. This order reduces the risk of short circuits during installation. Place an inline fuse on the positive lead within 7 to 18 inches of the battery terminal. Make sure the fuse size corresponds to the wire gauge and the power draw of the accessory, not just the battery capacity.
Ensure the terminals are clean and dry before tightening. Tighten them securely but avoid over-torquing, which can damage the connectors or strip the terminals. Route the wires away from sharp edges and terminal hardware to prevent accidental contact or damage during box closure. Proper routing and securing keep everything safe and reliable over time.
Secure the Battery With Foam Padding and Test Fit
After wiring the positive and negative leads, the next step is to lock the battery in place with foam padding and test the fit. Choose high-density foam—closed-cell or EVA foam is best—to create a firm, compression-resistant cradle. Cut the foam to match your battery’s footprint, adding a thin layer underneath to prevent rubbing against the box floor. Shape the sides of the foam for a friction fit that limits sliding during turns or rough water, but leave enough clearance for easy removal. For a durable and secure connection, ensure your lead terminations are made with a reliable crimping tool to prevent loose connections that could shift under vibration. Additionally, this type of foam padding mimics the vibration absorption found in marine battery boxes designed for boat hulls. For the most secure wiring, consider using a battery strap to further reinforce the battery’s position inside the foam cradle.
Perform a fit test before final assembly. Dry-fit the battery by placing it into the foam cradle and shaking the box gently by hand to confirm it doesn’t rock, slide, or bounce. Verify that the lid closes smoothly without compressing the battery or disturbing the foam. Ensure you can remove the battery without tearing or damaging the foam. A snug foam cradle distributes load across multiple sides, reducing vibration and absorbing shocks. This secure lock-in helps keep the battery stable against hull flex and during hard landings or rough conditions.
Seal the Lid, Connect Your Fish Finder, and Add a Fuse
Seal the lid with a gasket made from neoprene, silicone, or EPDM rubber to create a watertight barrier. Place your foam cradle with the secured battery inside the box, then evenly space the bolts around the lid. Tighten them just enough to compress the gasket fully, ensuring a reliable seal. After placing the battery inside, install foam pieces around it to stabilize the battery and prevent movement during transport.
For any cable openings, use waterproof glands to prevent water ingress. Apply marine adhesive to all seams and corners of the box body, then coat both the interior and exterior with epoxy for added durability and resistance to moisture. This multi-layer sealing approach ensures your fish finder’s power system remains protected in harsh aquatic environments.
Connect your fish finder’s power lead by routing positive and negative wires through sealed pass-through points. Use a two-pin polarized connector to facilitate easy disconnection without compromising watertight integrity. Keep your wiring neat by managing cables carefully and applying heat shrink tubing at all splices to prevent corrosion and short circuits.
Place the inline fuse on the positive wire as close to the battery terminal as possible, ideally within 7 inches. This setup offers essential fuse protection against overcurrent. Choose a sealed fuse holder, select a low-amp fuse—somewhere between 2A and 5A—and apply dielectric grease to the fuse and holder to prevent corrosion. Keep the fuse accessible for quick replacement without needing to open the entire waterproof container.

5-PIN On/Off ROCKER SWITCH with DPST design (Double Pole Single Throw), Quick and Simple installation, freely turn on and off your accessory.

The waterproof cable pass through cable clam fit diameters up to 1.08" (27.5mm) and connectors up to 1.34" (34mm).Round seal design allows installation without removing cable or connectors.

The waterproof cable pass through cable clam fit diameters up to .50" (12.7mm) and connectors up to .7" (18mm). Rectangle multi cable seal for routing multiple cables through boat deck,RV roof, Auto roof.