
Ever wonder why your vehicle’s auxiliary battery suddenly won’t charge or your starter battery drains overnight? A bad battery isolator might be the culprit, causing these issues even with good batteries.
Recognizing the signs early can save you time and money, preventing you from replacing the wrong parts. Keep reading to learn how to spot the hidden faults before it’s too late.
Is Your Dead Starter Battery Really a Bad Isolator in Disguise?
A faulty isolator is often the real culprit when your starter battery drains unexpectedly, even when the alternator checks out. It’s a small component—usually a diode or relay—that’s responsible for managing the flow of current between your vehicle’s battery banks. If it fails, the isolator no longer prevents the auxiliary battery from discharging the starter battery when the engine is off. This is similar to how a smartplug shore power connection manages and prevents reverse current flow in marine electrical systems. This malfunction lets the auxiliary or secondary battery drain the starter battery through reverse-current flow. Even if your batteries seem healthy and your alternator is charging properly, the isolated battery system can still fail to keep the starter battery charged. You might notice that your vehicle starts fine after a short rest, but when parked overnight, the battery is dead again. Voltage readings can fluctuate day to day, pointing to an intermittent isolator failure rather than a battery or alternator problem. To diagnose this, you need to test the isolator directly—measure the voltage across it when the engine is off and on. If the isolator is faulty, it won’t properly disconnect the battery banks and allows current to leak overnight. Replacing a defective isolator is often necessary, as maintenance routines centered on batteries and alternators won’t fix a damaged isolator and won’t prevent your starter battery from draining. For vehicles with flag terminal adapters, ensuring a secure and conductive connection between battery posts is equally critical to avoid voltage drop that mimics isolator failure. Similar to how a damaged shore power cord can cause arcing and intermittent failures in marine systems, a corroded or loose connection at the isolator can produce false symptoms that lead you to suspect a battery or alternator issue.

Discharging the accessory battery, for example, will not result in also discharging the starter battery

Product Type:Auto Accessory

Package Dimensions: 10 L x 1 H x 6 W (inches)
Why Your Auxiliary Battery Won’t Charge While Driving?
A bad isolator or relay is a common reason your auxiliary battery won’t charge while driving. When these components fail, they can prevent the flow of current to the auxiliary battery entirely. Even if the isolator seems to work, it might not energize due to internal faults or wiring issues. Poor wiring connections—such as blown fuses, loose terminals, or corroded grounds—also block charging current. Additionally, a blown fuse within the charging circuit stops any voltage from reaching the auxiliary battery. Always check voltage levels and ensure the relay contacts are transmitting power effectively. Excessive resistance across relay contacts indicates worn hardware needing replacement. For example, when connected to shore power, a faulty isolator can also interfere with proper battery management and charging. Using high-quality battery terminals ensures reliable electrical connections and minimizes resistance in the charging circuit. A thermal circuit breaker can protect the isolator circuit from overheating, but a faulty breaker may also interrupt charging. Finally, a weak or malfunctioning alternator or its regulator can limit the available charging voltage, leaving the auxiliary battery unattended.

【Function】——Voltage Sensitive Relay(VSR) cuts in at 13.3v and cuts out at 12.8v to ensure your main battery is always charged and ready to run your vehicle. The dual battery isolator can display the voltage, you can check the battery voltage in time

Function: The Voltage Sensitive Relay (VSR) ensures that the primary battery is always charged and ready to start the vehicle by cutting in at 13.3 volts and cutting out at 12.8 volts. When your engine is turned on and the starting battery is fully charged, the isolation will start charging the second (auxiliary) battery at the same time. Enables you to charge two batteries from one alternator at the same time.

High Battery Compatibility: With 300A high current, our dual battery isolator is the optimal charging solution for high-capacity dual-battery systems. It can adjust start-stop voltage, compatible with lithium, lead-acid and other battery types
Voltage Differences Between Batteries: A Telltale Sign of Isolator Failure
Measuring voltage differences across your batteries while the engine runs helps diagnose isolator issues. A voltage gap of 0.5V or more usually indicates a failing isolator that isn’t properly bridging both battery banks. When a failing isolator occurs, one bank will receive charge while the other doesn’t, creating this imbalance. Check the isolator’s terminals: with the engine running, the center terminal should show the alternator output. Both output terminals should be very close in voltage to each other. If the auxiliary side reads lower, it suggests a diode inside the isolator has failed.
Be cautious not to mistake cable resistance for isolator failure. Long or undersized wires can cause voltage drops that mimic a bad isolator. To accurately diagnose, measure voltage directly at the isolator itself, not just at the battery terminals. This approach isolates the true cause of the imbalance. Using this voltage gap as a diagnostic tool can help you determine whether the isolator needs replacement or if wiring issues are to blame.

Heavy Duty: ABS plastic housing, durable made for safety use, rear cover insulates terminals against any short of circuits, equipped with 4 sets of bolts.

Easy Installation: The side post design and removable bolts make the installation process more straightforward, eliminating the need for additional battery cables or connectors; direct connection to the battery is sufficient

Spec: Unit Type: BATTERY ISOLATOR, Brief: NEGATIVE GROUND2-BATTERY SYSTEM2 BATTERY STUDS1 ALTERNATOR STUDNO EXCITATION STUD90A MAX OUTPUT
Dashboard Voltage Fluctuations: What a Failing Isolator Reveals
Dashboard voltage fluctuations are a clear indicator of a failing isolator. When the isolator begins to fail, it doesn’t maintain a steady connection between the battery and the charging system. This results in the dashboard gauge flickering independently of engine speed or load, often showing rapid swings or spikes in voltage that come and go unpredictably. You may notice the voltage needle cycling on and off, causing the indicator to jump between normal and low readings. Additionally, dashboard lights may dim and brighten in short, irregular cycles. If your alternator output appears normal but voltage readings on your dashboard fluctuate, the isolator is likely the problem. Repeated cycling caused by a weak solenoid or corroded wiring creates this erratic behavior. Ignoring these signs can lead to battery drain or charging issues, so it’s important to address an isolator that isn’t maintaining a stable connection.

Advanced Dual Battery Isolator 12V Kit – Designed for superior performance, this dual battery kit ensures efficient power distribution between two batteries without voltage drops. Unlike traditional battery isolator diodes, this automatic disconnect switch eliminates power loss while maintaining a seamless connection between your primary and auxiliary power sources. Compact at 2.6” x 2.6” x 2”, it’s perfect for under-hood installations or as part of a battery relocation kit.

【Function】——Voltage Sensitive Relay(VSR) cuts in at 13.3v and cuts out at 12.8v to ensure your main battery is always charged and ready to run your vehicle. The dual battery isolator can display the voltage, you can check the battery voltage in time

RELIABLE POWER SOURCE - Get a reliable power source for all on-road travels and off-road expeditions with a smart dual battery isolator; Keep your main battery charged and engine running to ensure your automobile never run out of power in remote areas again
Battery Drain Overnight? Test Your Isolator With a Multimeter First
To test if your isolator is causing a parasitic drain, start with a multimeter set to the 10A DC amps range. Disconnect the negative battery cable and connect the meter in series between the cable and the battery post. Ensure the engine and all accessories are off, with doors closed. Allow the vehicle to sit for 10 to 45 minutes so modules can enter sleep mode. A draw above 100 milliamps indicates an abnormal parasitic drain. If one battery discharges faster than the other, it suggests the isolator isn’t properly isolating circuits. To pinpoint the specific circuit, use a multimeter set to millivolts to detect voltage drops across fuses, then convert the readings to milliamps. Corrosion on terminals can worsen this issue, and a failing isolator may also reduce alternator efficiency by feeding power unevenly. Always test the isolator first before assuming the battery itself is the problem. A faulty isolator can prevent the starting battery from receiving a proper charge, leaving it unable to crank the engine when needed.
How to Test Your Isolator for Parasitic Drain in Five Minutes
To test your isolator for parasitic drain in about five minutes, start with a straightforward plan. First, turn off the engine, switch off all accessories, and close every door. Allow the vehicle to sit for at least 20 minutes to give modules enough time to enter sleep mode. Set your digital multimeter to DC amps and select the highest range initially. Disconnect the negative battery cable and place the meter in series between the cable and the terminal. A normal reading under 50 milliamps is acceptable, but excessive draw is indicated by readings above 50 milliamps. For added safety during this test, consider using a kill switch with lanyard to quickly disconnect power if needed. Applying dielectric grease for battery terminals can help prevent future corrosion on connections.
Check the current reading—under 50 milliamps is normal, but over 100 milliamps indicates a potential parasitic drain. If disconnecting the isolator causes the current to drop, it’s likely the culprit. Ensure all battery switch wiring is correctly routed and free of loose connections to avoid false readings. To locate the source, pull fuses one at a time, watching for a sudden reduction in current. Use circuit diagrams to identify which fuse supplies power to the isolator. Inspect the wiring for shorts, corrosion, or damaged connections. This quick test can pinpoint parasitic drain issues efficiently, saving you guesswork and time.

High Current Battery Switch: With a rated current of 200 Amp Continuous, and 1000A Intermittent, Spurtar battery disconnect switch safely isolate and secures 12-48V DC electrical system connections
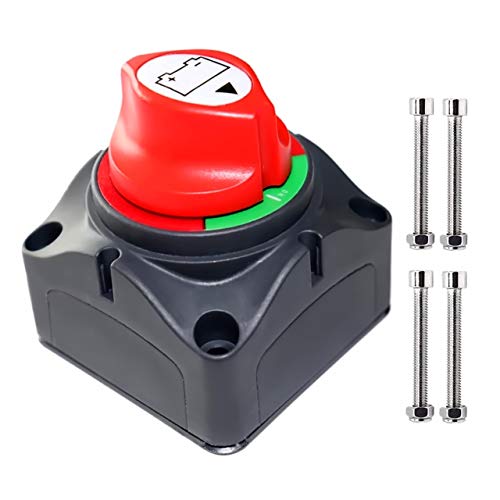
Wide Application: Battery isolator switch is universal used for Car, Van, Caravan, RV, Truck, Marine Boat, Camper, Travel Trailer, Battery Box, ATV, UTV or or any vehicle where a battery cut-off switch is required.

Constructed with thickened, high-grade pure copper contacts, this heavy-duty battery disconnect switch ensures maximum current transmission efficiency, exceptionally low resistance, and minimal voltage drop. The robust, anti-corrosion design effortlessly supports heavy starting currents, effectively avoiding overheating and ensuring stable, safe operation for advanced automotive circuit systems
What That Repeated Clicking Sound Really Means for Your Isolator
When you hear that repeated clicking sound from your isolator, it indicates the relay is cycling near its voltage threshold. This happens because system voltage fluctuates around the relay’s trigger point, causing it to open and close rapidly. The chatter suggests unstable voltage is hitting the sensing circuit, often due to poor connections or low battery voltage. For reliable operation, selecting a best master switch can help prevent voltage cycling issues by providing a clean disconnect point. In a similar way, ensuring your trolling motor battery receives consistent voltage from a solar panel requires matching solar panel wattage to the motor’s draw and charging needs. To troubleshoot, check the voltage drop across the relay contacts when it’s energized. Connection corrosion on the trigger wire or ground terminals can mimic a failed isolator by breaking the control circuit, resulting in rapid cycling. Additionally, a weak house battery pulling voltage down during engagement can cause the relay to flutter. If cleaning terminals and tightening ground connections don’t stop the clicking, the internal relay contacts may be worn or arcing. In that case, replacing the isolator is usually necessary to restore proper operation.
Hot Cables and Burning Smell: How Overheating Isolators Signal Failure
Overheating isolators are a clear warning sign of failure, indicated by hot cables and a burning smell. If you notice cables that are too hot to touch, look for loose, corroded, or poorly crimped connections, which cause increased resistance and heat buildup. A burning odor—either acrid or fishy—means the insulation is starting to break down. Physical damage such as melted plastic, burn marks, or discolored terminals confirms overheating issues. Concentrated heat at the terminal clamp points to a poor connection, while heat running along the entire cable suggests an undersized wire or overload condition. Do not ignore these signs—shut down power immediately. Any smell of burning near electrical parts indicates a serious fault that cannot be overlooked.
Fuses Blowing Repeatedly? Why the Isolator Is Likely the Culprit
When a fuse blows repeatedly, the isolator is often the underlying cause. The fuse itself isn’t typically the problem; instead, an unresolved overcurrent condition downstream keeps causing it to blow. To diagnose this, start by checking the circuit continuity from the load side of the fuse holder to ground. Near-zero resistance indicates a dead short downstream, which is usually caused by damaged wiring, corroded connectors, or an internal fault in the isolator. If the fuse blows instantly when you turn on a load, you should inspect the isolator branch before installing a new fuse. Remember, the fuse is only reacting to the overcurrent; it’s not the root issue. Disconnect components on the affected branch one at a time, and if the resistance returns to normal, you’ve identified the faulty part.
Accessories Dying Too Fast? Blame a Bad Isolator, Not Your Batteries
A faulty isolator is often the culprit if your accessories die prematurely, not your batteries. When your secondary battery only charges while the engine runs and then quickly drains, the isolator may not be closing properly. This failure prevents proper voltage transfer, causing your auxiliary battery to starve and your gear to cut out sooner than expected. You might also see low voltage readings that suggest weak or dead batteries, but in reality, it’s the isolator not functioning correctly. Before replacing batteries, test the isolator to see if it’s allowing charging cycles as it should. A bad isolator can mimic dead batteries and reduce your gear’s lifespan, so diagnosis starts right here. For a reliable power distribution solution, consider how a distribution block can manage your amp setup’s current flow. Choosing the right cable gauge, such as 4 AWG or 2 AWG battery cable, can also impact how effectively voltage reaches your accessories from a healthy isolator.