
Wondering if you can connect two cables to a single battery terminal? The short answer is yes, but it’s important to do it correctly to stay safe.
Proper stacking of cables, tight connections, and separating fuses are key to preventing damage or accidents. Keep reading to understand how to do this safely and reliably.
Can You Actually Attach Two Cables to One Battery Terminal?
Yes, you can attach two cables to one battery terminal, but it depends on the terminal’s rated capacity and how securely the connections are made. The terminal must be able to handle the combined current load of both cables; exceeding its maximum rating risks overheating and damage. Ensure each connection remains tight and free of corrosion, as loose or dirty contacts increase resistance and heat buildup. Use wires with appropriate gauge size for each branch circuit to prevent voltage drops. Before stacking cables, thoroughly clean the terminal surface to improve metal-to-metal contact. Securing the cables with proper clamps or terminal connectors is essential, and re-torque these periodically to maintain a stable connection. For installations with multiple circuits, consider using a dedicated master switch to safely manage and isolate the combined load. To further guarantee secure and vibration-resistant connections, use cable ties with screw holes to anchor each wire near the terminal. Vibrations can loosen crowded connections over time, which could cause intermittent power loss or sparking. If you notice any looseness, heat buildup, or corrosion, address the problem immediately to prevent potential failure or safety hazards. Always consult the manufacturer’s torque specifications to avoid overtightening a terminal stud when stacking multiple cables.
The Safest Way: When to Use a Bus Bar Instead
You should use a bus bar whenever terminals are too close for safe stacking or when you need consistent, professional wiring connections. Choose a tin-plated copper bar rated for your peak current capacity to ensure safety and reliability. Clearly separate positive and negative bus bars to prevent accidental shorts, and always cover any exposed metal with insulation to reduce the risk of electrical contact. Before connecting each positive lead to the bus bar, fuse it to protect against faults, since the bus bar itself only distributes current and doesn’t serve as a safeguard. Keep all hardware tight and surfaces clean—this prevents hot spots that can cause overheating and helps resist corrosion, especially in damp or humid environments. For the highest current draw or engine starting, ensure the bar’s rating matches your system’s surge demands, just as you would with premium battery terminals designed for minimal voltage drop and maximum clamping force. When managing power while connected to shore power, using a battery disconnect switch can help isolate circuits and prevent unintended drain or electrical faults. Note that deep cycle batteries in cars, while offering longer reserve capacity, require careful consideration of the bus bar’s rating to handle the higher sustained discharge typical of auxiliary loads.


1Pcs c110 solid tin plated copper flat bus bar stock, 3mm x 20mm x 11.81 inch / 300mm, about T 3/25" x W 4/5"; Tinned copper bars have better corrosion resistance, longer service life and wider usage scenarios

250A MaxiBus BusBar with 4 studs (part number 2127)
How to Calculate Total Current Load Before Adding a Second Cable
To accurately determine the total current load before adding a second cable, you need to sum the peak current draws of all loads on the circuit. To do this, identify the power consumption (in watts) of each connected device or load. For DC circuits, estimate the current with \(I = P / V\), where \(P\) is power in watts and \(V\) is voltage. For example, a 2400 W load on a 12 V system draws approximately 200 A. Always use the highest expected operating current rather than an average to ensure safety and system reliability. For vehicles that sit unused for long periods, a remote battery disconnect switch can help prevent parasitic drain and reduce the risk of fire. Next, calculate the total current by adding the peak currents of all loads that will run simultaneously. This total determines the appropriate cable size and capacity. When designing the wiring, consider the entire circuit length, including both positive and negative conductors, to accurately assess voltage drop. Longer runs require thicker wire because voltage drops increase with distance. It’s crucial not to size cables based on each load individually but on the combined current load, adding a safety margin of about 20%, and rounding up to the next standard wire gauge. If the total load approaches the maximum capacity of your cable, choosing a larger gauge prevents overheating and ensures longevity of the wiring system. For users prioritizing overall system safety, selecting a top battery disconnect switch with reliable performance adds an essential layer of protection.

Heavy Duty: ABS plastic housing, durable made for safety use, rear cover insulates terminals against any short of circuits, equipped with 4 sets of bolts.

High Current Battery Switch: With a rated current of 200 Amp Continuous, and 1000A Intermittent, Spurtar battery disconnect switch safely isolate and secures 12-48V DC electrical system connections

Heavy Duty: ABS plastic housing and premium copper terminal, durable made for safety use, not easy to aging and abrasion resistant, to ensure maximum strength and durability for long lasting usage.
Fusing Two Cables on One Battery Terminal: Why It’s Non-Negotiable
When connecting two cables to a single battery terminal, each cable must have its own fuse. The protection belongs to the wire, not the terminal itself. Relying on a single fuse for both cables leaves one unprotected if the other shorts. Place each fuse within seven inches of the terminal to minimize unprotected conductor length, which reduces fire risk from accidental grounding. Ignoring this rule can lead to terminal corrosion and voltage compatibility issues that impair fuse operation. A corroded terminal increases resistance, causing voltage drops and potential nuisance blows or delayed tripping. Applying high-quality dielectric grease to the terminal before connection helps prevent corrosion and ensures consistent voltage flow. This setup ensures you’re protecting each wire’s ampacity, not just the battery. Without individual fuses, you risk melted insulation and arcing, as short-circuit energy can ignite immediately. Proper fusing is essential for safe, reliable electrical connections. For boat owners, selecting red and black battery cables that clearly identify the positive terminal helps prevent polarity errors during connection. When using a DC to DC charger with solar input, each input cable must also be independently fused at the battery terminal to prevent overloading the wire gauge.

BATTERY TERMINAL MOUNT: Installs directly on battery stud for compact distribution

Product Type: Fuse rated current: 30A; Maximum rated voltage: 58V DC; Stud Size: 5/16"(M8); Terminal mounting hole: 3/8"(M10)

Reference Data: Rated for 100A current and a maximum voltage of 58V DC, this mrbf fuse has its stud size at 5/16“ (M8) and the terminal block mounting hole size at 3/8” (M10), meeting relevant circuit protection requirements
Why Stacking Order Actually Matters
Stacking order matters because the position of each cable in the stack directly affects contact pressure and electrical reliability. The highest-current cable must sit at the bottom, directly against the battery post, to ensure maximum metal-to-metal contact for the primary load. Smaller rings should be stacked above it because they don’t share clamp pressure evenly; the uppermost lugs bear the most nut torque, which can deform them. If the top ring is damaged, it compromises the stability of the entire stacking arrangement. Proper order also prevents terminal corrosion, as uneven compression creates gaps that trap moisture and debris, leading to arcing and excess heat. Prioritizing load size and contact area minimizes resistance, keeps connections secure, and helps maintain a clean, reliable terminal. For dual battery setups, this practice is especially critical to ensure deep cycle batteries deliver consistent power without voltage drop or overheating. Additionally, providing proper ventilation for battery boxes prevents the buildup of explosive hydrogen gas, a key safety concern for boat owners. Choosing the correct fuse block size for your boat ensures that the total current draw of all connected circuits does not exceed the block’s rating, preventing nuisance trips or fire hazards.
How to Properly Stack Ring Terminals on a Battery Post
To properly stack ring terminals on a battery post, start by seating the largest-current lug directly against the post to ensure the broadest and most reliable contact surface. Place each smaller ring terminal flat on top, making certain no crimped sections overlap. If necessary, rotate the terminals so the stack sits flush. Select the ring terminal that matches your wire gauge for a snug, secure fit to prevent loose connections.
Before stacking, thoroughly clean all terminal surfaces to prevent corrosion. Use a wire brush or terminal cleaner to remove any dirt, oxidation, or residue. Tighten the clamp nut to a firm, even torque to secure the stack firmly in place. Avoid using wing nuts or lock nuts, as they do not hold securely and can loosen over time. Unlike a thermal circuit breaker, a standard fuse does not reset, so for sensitive onboard electronics, ensure your power source delivers a clean sine wave to avoid erratic behavior or humming from devices like chargers and navigation equipment.
Over-tightening the nut can crush the lugs and damage the terminal, leading to poor contact. Conversely, loose stacking creates higher resistance, which can cause heat buildup and potential failure. After tightening, verify the connection by checking for wobble; any movement indicates the need to re-tighten or reposition the terminals. Ensuring a secure, flat connection promotes stable current flow and long-lasting battery performance. For applications requiring frequent disconnection, consider using a battery box with strap to keep the assembly organized and secure.
Best Hardware for Two Cables on One Battery Terminal
Dual-entry top-post terminals are the best hardware choice for connecting two cables to one battery terminal. These terminals are designed to accept two cables directly, using multiple fixing points such as three M6 screws to evenly distribute clamping force. They are typically made from tin-plated brass, which helps prevent corrosion and ensures long-term reliability. For side-post batteries, a dedicated adapter that replaces the existing side-post screw is preferable. This adapter provides a secure eyelet point without altering the factory hardware or compromising battery insulation. For permanent setups, stud-based terminals with M6 or M8 threads paired with tinned copper ring terminals offer low resistance and corrosion resistance. Always verify your hardware matches your cable size, usually ranging from 25 to 95 mm² for heavy-duty applications. Using dedicated dual-entry hardware eliminates guesswork and reduces the risk of overheating or loose connections. When charging a deep cycle battery, ensuring a secure and corrosion-resistant connection at the terminal is especially important to maintain long-term reliability during extended use on a boat. For marine applications, choosing a corrosion-resistant terminal design is critical because exposure to saltwater can accelerate failure, much like a shore power inlet must withstand harsh conditions.

PACKAGE INCLUDE --- 1 Pair of Battery Terminal Connector, positive and negative standard top post connectors.
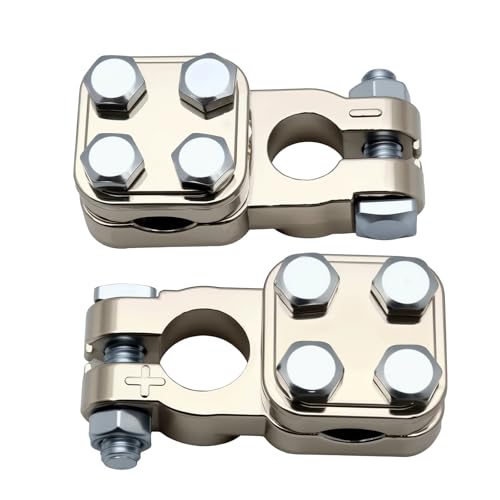
Compatible Models:Widely used for diesel truck, boat, car, RV vehicles, marine battery terminal connector and electrical equipment which have a standard top post battery. Used for battery extension, parallel connection, and ground connection

Zinc-Plated Terminal Ends: The Schumacher Electric BAF-MT2 Coated Marine Terminal Ends feature zinc plating for three times more conductivity than uncoated battery terminal ends
5 Stacking Mistakes That Cause Overheating
Stacking two cables on one battery terminal can seem simple, but five common mistakes can lead to dangerous overheating. First, loose or poorly connected stacks increase electrical resistance, which produces heat that can damage cable insulation over time. Terminal corrosion between the lugs also raises resistance and can make the connection dangerously hot under load. Second, fitting too many lugs together reduces the contact area, creating hot spots that can deteriorate the connection. Third, stacking with the wrong order—such as placing washers between lugs—lifts the terminal contact, increasing the risk of arcing and sparking. Fourth, using conductors that are too small for the current flow causes excess heat as the wires struggle to carry the load efficiently. Fifth, contamination, corrosion, or damaged insulation from localized heating further worsens the risk, making the terminal feel hot within minutes if these mistakes are present. Proper stacking practices and regular inspection help prevent overheating and ensure safe operation.

【What You Get:】In this set, we offer 10types 80Pcs of AWG 2 4 6 8 10/12 ring terminals copper lugs battery cable ends open end termination ring terminals with 80 Pcs 3:1 Dual Wall Adhesive Heat Shrink Tubing for your work which meet your different needs.

[ Package Includes ] 10 pcs 1/0 gauge (AWG), 3/8" (M10) stud battery cable lugs with 10 pcs 3:1 marine grade dual wall adhesive heat shrink tubes

The battery terminal connector is made of high-quality pure copper material, which is resistant to high temperature and corrosion and achieves maximum conductivity.
How to Verify Your Two-Cable Setup Is Safe
Verify that your two-cable setup is safe by first ensuring both lugs sit flat against the battery terminal and that the wire gauge matches the terminal hole without gaps or rocking. Use a torque wrench to tighten the connections to the manufacturer’s specified torque, typically between 50 and 70 inch-pounds for SAE terminals; avoid relying solely on feel. Check for any white or green corrosion buildup, then clean it off to prevent future corrosion and ensure a solid connection before final tightening. Measure the voltage drop across the cables under load—if it is higher than recommended, it indicates excess resistance that needs addressing. Confirm each cable has the correct fuse installed, suitable for the connected component, to protect against overload. Finally, make sure no stress pulls on the terminal connections, and recheck the setup after your first test run to ensure everything remains secure and safe.